Saturday, April 25, 2015

Hollow ring project

Been working on our last project. I started out with a lot of sketches and designs, this project was particularly hard to figure out what I wanted to do. Not sure why, but maybe its because I am rather uninterested in big rings.

I finally came up a design I like. Its a bit simplistic, but I think it is interesting enough and will certainly be a challenge, especially with the amount of time we have to work. 
From here I made a paper model of what I wanted.


I dont know if I would wear this regularly... but I suppose that is the hollow ring style for you. From here I made the ring out of copper. I had to get my ring size and carefully measure and cut it, then bend the ends together and solder it. Turned out pretty well. 


From here I also had to do the same process for a brass ring and shaped it into the form I wanted the ring to be in, then solder it closed. Because I want to have holes in my plates, I could close the brass ring. Once I had these two, I soldered them onto my copper plate. This proved difficult (as always with soldering). Thankfully, Justine helped me solder this together by adding another touch to the bottom, increasing the heat and the solder finally melted in place, though it took a few tries. She also gave me some good tips for soldering!


Big dipper constellation from behind


I am thinking of doing some salt etching to the copper plates, because I think it looks a bit simple as it is now. I am not sure though, because I cant think of something that will go with my design. I also cant do anything else until monday when we have saw blades to work with. Hope I will have enough time to finish. 

Monday, April 20, 2015

new project

So this new project proved to be quite the task! I had lots of plans for it, and in the end I deviated a lot, but I am happy with how it turned out.


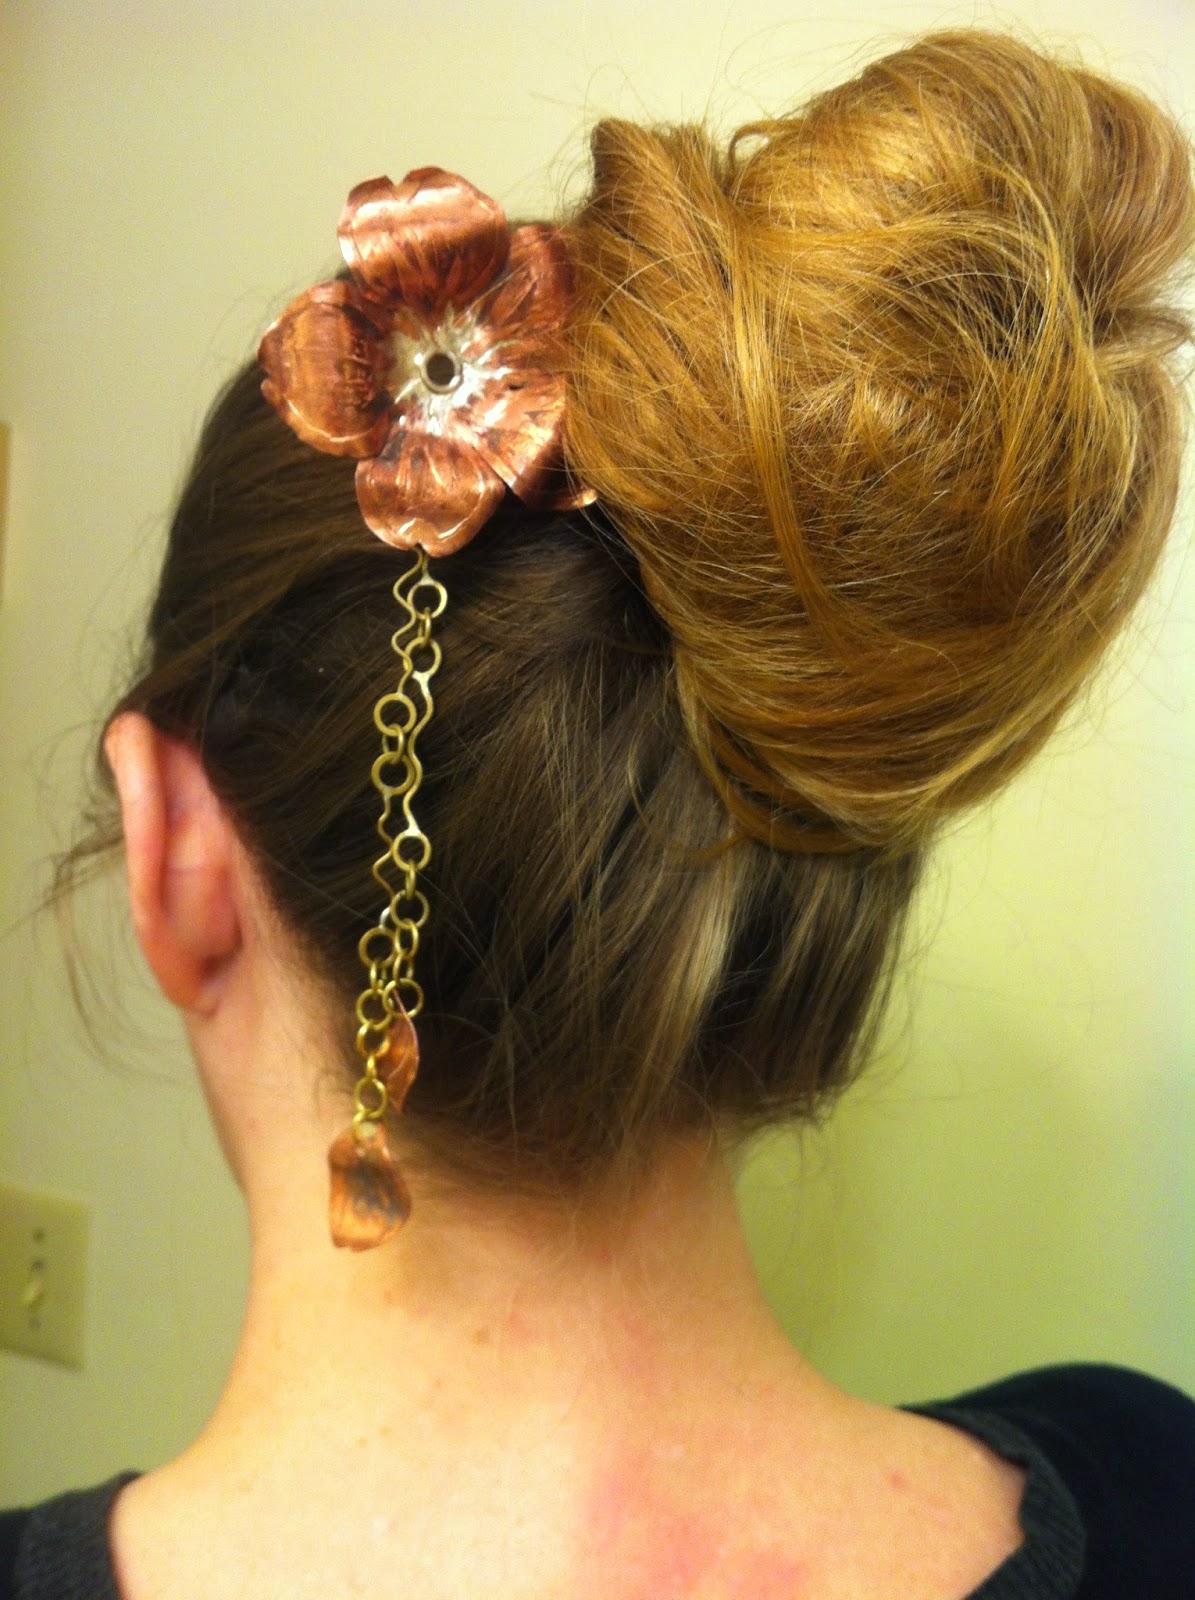
Getting started with the project is always the hardest part, but I started off by working on some jump rings and making some organic shapes. This on its own proved to be terribly difficult and tedious, mostly due to the tiny soldering precision needed. I had to re-make a lot of the bars until I was able to make a shape I was happy with. I made the chains out of brass as I liked the yellow/gold look, and I wanted the flower itself to be a stained copper. I considered painting it, but I liked the metal shades. I thought there was something very pretty about the brass yellow and the pinkish copper together that went with my piece. However, the brass chain made cleaning the solder seams extremely difficult. no matter how much i sanded away, I simply couldn't get it clean enough!! If I colored it, I think it would look a bit tacky. I have always found the rustic look a bit appealing

I had a very difficult time getting the flower together. Mostly the soldering. Always the soldering! But I am learning and the practice is helping I think. I often try to get as many tips as I can from those around, and I am improving. at least a little. I started out with a plate of copper and thinned it quite a bit to make it lighter and more flexible.

I liked bending the flower to an organic shape, it felt like sculpting, something I am more familiar with. However, in retrospect, I would have done some things in a different order. I would have soldered the inner ring, the two back coiled sticks that go into the hair, and the chains BEFORE I etched and shaped the flower. But having etched the flower before I soldered left a lovely affect of the solder bleeding into the etched grooves in the center of the flower. I with the ring in the center turned out neater though. Really frustrating. I think I took the torch to that flower at least 10 times. The advanced students were helpful in giving me some advice as I worked through my struggles, and in the end I am happy with how it turned out.


the struggle of getting good photos of shiny things... photography is legit business. Anyway, I hope to wear this when my hair grows long enough to have it in a bun! I think turned out how I intended it to,  I wanted it to be like the lovely hair japanese hair pins I saw many fancy dressed girls wore while I was in japan.

Tuesday, March 3, 2015

finished bookmark and 2nd project plans

Finally finished my bookmark. Almost had it finished on time but the drill bit i was using broke just before I was finished, and there wasn't another one to replace it. But I was able to finish it the next day, and in the end I suppose it turned out all right. Not sure how efficient it will be as a bookmark, but considering how it is my first time doing anything with metals, its not bad. Metal is certainly not my favorite medium. Its so unforgiving compared to clay or paint or even just drawing. So many tedious steps. I suppose it is nicer in the fact that I can make wearable, usable items, unlike painting and drawing where I am most comfortable, but my god the amount of time it takes to make anything is crazy. It may just be my skill level making me slow, but it seems to take a long time in general. Just so many steps, and you really have to plan eeeeeeeevery thing out in advance, which i absolutely hate doing. I cant stand measuring and planning and all that. I quickly get unexcited about a project after I start, as I am a bit ADD and my passion runs out early (thats also an aries trait, hehe) which is why I like stuff where I can just have at it and get it done quickly. This is also why my art is usually very messy, but its a style I like personally. Things being perfectly clean and neat gives me a bit of anxiety to be honest, mostly cause all I can think about is all the painstaking time it must have took to make it that way. It seems to be expected for metal work to be clean and neat and organized, what with craftsmanship and all that.


One aspect I did enjoy in this project was the texturizing and coloring of the copper. I suppose it is the most similar to painting and stuff, but I think its the part that turned out the best anyway. I would like to do a piece with lots of opportunity for this kind of thing. 


But apart from all my frustration, it is, as I stated earlier, interesting to have such a usable medium; that is, being able to make functional, lasting objects. And of course the idea of making jewelry sounds appealing. Certainly would be nice to make something I like wearing. But based on my skill level at the moment, I doubt I am going to make anything really nice to wear any time soon. Not anything I can come up with anyway... all my ideas for the next project come out very organic, which seems to be a bit more difficult with such an inorganic medium. Geometric shapes certainly aren't my typical way of thinking. Going to have to really stretch my brain for this next project.

I really have no idea what to do for my next project. I come up with lots of ideas, though hardly any of them fit the theme of micro and macro. Unless of course I did another celestial themed work.

sketches and such:


 no idea if this would even work. or how to begin to make it. The symbols are from my favorite videogame Half Life. with the Black Mesa symbol around the wrist, and the Lambda symbol for the ring. they are both giant corporations. macro? that would be a chain connecting them btw. aint nobody got time to cut out a proper chain from paper.

 the jellyfish in the right corner is a fun idea, but doesn't fit the theme. sigh.
 I like this flower necklace, but again it doesn't fit the theme of micro macro. I hate themed projects... :/


 simpler version of the Half Life/Aperture theme at the top, but I think it would be too simple. I mean I would wear it for sure, and I would certainly spend plenty of time working on it for it to be a good bit of work, but idk.


basically have no idea what to do. Flower is my fav idea.  The black Mesa/Aperture necklace is the most do-able, and fits the theme better though.


Monday, February 23, 2015

Continuing on Bookmark and Learning how to make a chain


The impending due date is coming up for the bookmark, so I have been rather stressed getting that done. Soldering is a bit of a nightmare at first; after what I thought was a successful job of soldering all 9 planets on the brass sun plate, I am disturbed to find them all fall off during quenching and pickling. After an infuriatingly long time, and thanks to Aurthor and the help of some advanced students advice, I was able to attach them all. I have to say it is a shame I cant keep the coloring the flame and heat created while working. Once I had fully finished, it created a beautiful rainbow color effect. but alas I had to clean it and sand it, with which I am not yet finished.


I have found myself very behind in this project due to the stupid snow days, and now I will either have to quickly slap it together to finish it on time, or turn it in late and make it more like what I originally wanted, but get a lower grade. uhg. I really hate boone weather.

But I think I finally got the hang of soldering, and I decided it is tedious and exhausting. My ADD really kicks my ass with these intricate details and steps. I originally wanted to cold connect sun rays atop of the sun to give it more dimension, but I simply don't think I will have time for that now, unfortunately.

Guess we will see what happens in the next few days. It is only the first project after all.


That being said, the next project will be wearable, which is exciting, but also means it will probably means lots of tedious work on making the chains for it. Guess I'll find out...


Saturday, February 14, 2015

bookmark work


Continuing on class and working on my bookmark. We learned how to solder, which is going to save my biscuits with this project. We learned exactly how it works, how it differs from welding, and the process it takes to do it. More torch work!

There are a couple steps to this which could make it rather tedious in my opinion. Especially with my 9 planets I need to solder onto my brass plate. We will see I suppose.

First you need to clean the metal, and you do this by sanding it with sand paper. No touching the area after, or you have to sand again. I guess the oils on your skin affect it?

Then, you use the flux, which is a white mixture next to the torches. You put this on the area you want to solder.

After that, we use the hard solder, which has 3 bends at the top so we can tell which one it is. clip the little bits off and place them with tweezers where you want them.

Then torch with a more specific point on the flame. I have yet to do this however, so we will see how this turns out with my inlay example. I want to try it on that before I do it on my book mark. So far it has just been a lot of sawing. My arms are still sore from sawing that brass plate out. But the next step once it is sanded and shaped how I want would be to solder. Unless I can figure out a way to work the nickel medal into the peace.


soldering info...
 progress!


 planning...


Friday, January 30, 2015

Metalsmith and Jewelry design

Metalsmith and jewelry design~

I cant say I have ever done a blog before, so this feels a bit strange. 

Metalsmith and Jewelry design is a completely new subject and medium for me. I am used to 2D type of art, like painting and drawing. They are more forgivable I think, and don't need quite so much teaching and scary tools. That being said, I think it is good to take a class outside of your comfort zone to learn, cause thats the point of college, right?

I missed the first week, so I immediately felt overwhelmed and scared, but I am catching up and am feeling more comfortable now as we get into our first project. There is a lot to metal that I had no idea existed. I hope I can remember it all.

Day 1 (3)- 

My first day was everyone else's 3rd, so I had to do some catching up. I learned about annealing metal and having it work-hard, what these do for the metal, ect. I learned about the tools used in cutting metal, the differences in metal, and about cold-connections things together. We made our little metal pieces and turned them in. The very first thing I did was use the blow torch  what a way to start a class. 

Day 2 (4)- 

We learned about doing rivets and how to connect two pieces of metal with an open rivet. We also learned to put patterns on the metal, which sounds artistic and helped me get more interested. 

Day 3 (5)- we looked at our sketches for our first project. I am feeling more excited now that we have learned how to do certain things, and I have a goal to create something I am interested in. My project may be a little bit much for me to be able to do, but I would like to try. 

I plan on making a bookmark with all the planets and the sun. I love astronomy, and I take a lot of classes, so Its an appropriate theme for a bookmark at least in my life. I plan on having one long unbroken strip of brass for the sun and the back plate to all the planets, and I plan on using copper for the planets and cold connecting them on top. 


Its going to be a challenge but if I can pull it off I should have a pretty nifty bookmark for my astronomy textbook!